Workspace overview
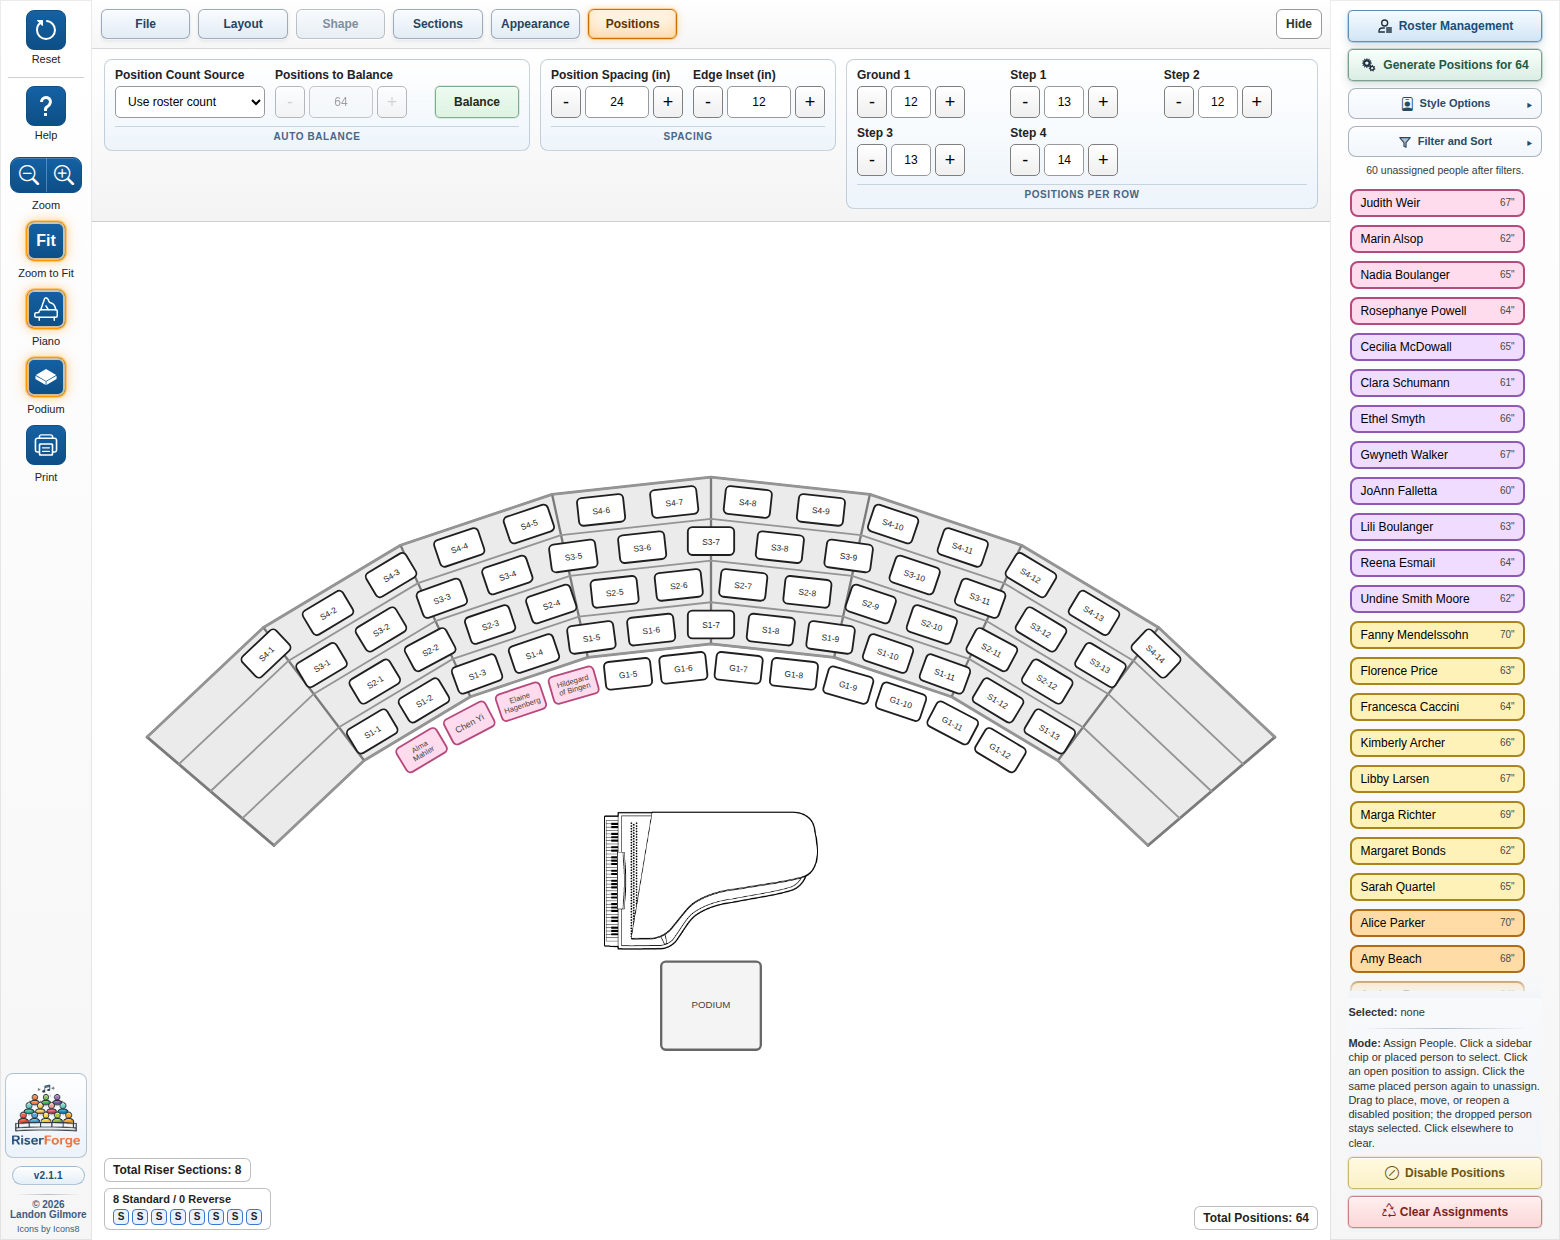
Generated positions on the chart, the Positions ribbon open at the top, and the roster sidebar ready for assignment work.
Published User Guide
RiserForge is a browser-based planner for choral riser layouts, roster assignment, and print-ready staging charts. This guide tracks the current app labels and workflows so you can move from a blank layout to a finished chart without guesswork.
These screenshots were captured from the live app so the guide shows the real interface, not placeholder art.
Generated positions on the chart, the Positions ribbon open at the top, and the roster sidebar ready for assignment work.

The import/edit dialog combines file actions, sortable roster rows, a warnings panel, and the Group Manager in one place.

Choose whether to print the chart, the assignment list, or both, and decide how disabled positions and assignment scope should be handled.
The docs site now includes a dedicated social preview image, and the page metadata points to it so GitHub Pages links can render a proper large-card preview when they are shared.
You do not need every control on every project. The most reliable path is to establish geometry first, create positions second, then bring in roster data and assignments after the layout is stable.
Use the top ribbon’s File and Layout tabs to define the base chart.
Stay in the top ribbon to define how many rows and sections are available before you place people.
Use the right sidebar shortcut or the Positions tab to generate a starting set of slots.
Open Roster Management from the right sidebar when the chart geometry is ready.
.csv, .xlsx, or .xls roster files.The default sidebar mode is assignment. Switch to disable mode only when you need intentionally open slots.
Once assignments are stable, style the chart, print what you need, and save the session file for reuse.
.riserforge.json working session.The app is organized into a left toolbar for viewing and output, a top ribbon for chart geometry, a right sidebar for roster work, and the center canvas for direct manipulation.
Reset returns the session to defaults, Help opens this guide, Zoom and Fit control the view, Piano and Podium toggle stage objects, and Print opens output options.
The ribbon tabs are File, Layout, Shape, Sections, Appearance, and Positions. Some tabs disable automatically when the selected layout type does not support them.
This is the roster workspace. It includes Roster Management, the Generate Positions shortcut, roster styling controls, filters, sort tools, the unassigned list, and the assign/disable mode toggle.
The chart updates live as you edit counts and geometry. Assigned singers, disabled slots, layout counters, the piano, and the podium can all be managed directly on the canvas.
These are the controls most users touch during setup. The names below match the current UI so the guide stays aligned with what you see in the app.
The File tab holds chart headers and working-session persistence. Use
Upload to load a saved session and Download to save the entire layout,
roster, assignments, filters, counters, and stage-object state into a .riserforge.json file.
The Layout tab establishes the overall row model. This is the right place to decide whether you are working with a freeform Generic geometry, a flat/floor layout, or a Wenger-based preset.
These tabs depend on the selected layout type. Shape is a Generic-only tool. The Sections tab is available on non-Generic layouts that use section-based arrangements.
The Appearance tab styles the chart itself. These settings affect how the risers and placed position chips appear, not how roster chips look in the sidebar.
The Positions tab is where auto-balance and manual row editing meet. This is the core placement workspace once your geometry is roughly settled.
Not everything lives in a form. The canvas and stage objects support direct editing once the geometry exists.
Roster work is split between the right sidebar and the full-screen-ish Roster Management dialog. The sidebar is for day-to-day filtering and assignment. The dialog is for bulk edits and imports.
Use Add Row, Clear All Rows, Download Template, Download Current, and Import File to manage roster files and table data.
Groups are optional, but they are useful for sectional color-coding and filtering. Group setup happens in the lower-right area of the roster dialog.
Apply Changes commits the edited roster to the live chart. If the existing chart already has assignments, RiserForge asks how you want to reconcile them.
The right sidebar affects the unassigned roster list only. This is separate from the Appearance tab, which controls the chart itself.
Assignment is intentionally fast. Most day-to-day work happens without reopening the roster dialog once your roster data is in place.
Assign mode is the default sidebar state. It supports both click-based and drag-based placement.
Switch the sidebar button from Disable Positions to Done Disabling when you need permanently open or blocked slots in the current layout.
The sidebar’s Clear Assignments button removes chart placements without deleting your roster rows, groups, or layout geometry.
Use the left toolbar to manage the view and nearby stage references while placing the ensemble.
The print dialog is designed for common rehearsal and performance needs: a visual chart, an assignment list, or both at once.
Use the left-toolbar Print button to choose which report types should be printed.
The dialog includes output filters so the printed report matches what you need to hand out.
The public docs include more than this guide. Use the pages below when you need release history or manufacturer source material for Wenger-based staging decisions.
The Release Notes page loads the public JSON feed that is refreshed when a GitHub release is published.
The Wenger Reference Library gathers the PDF files stored in this repository so they are easy to reach from GitHub Pages.
A few results in RiserForge are intentionally solver-driven rather than strictly literal. These notes explain the cases that most often surprise first-time users.